Whew! It’s been awhile since my last post, things have been busy the last couple of months as I worked on a long project with Richard Radstone (http://richardradstone.com/). As soon as we get the OK from the client I’ll post some new technique ideas that came to me while working on that job.
But this week I’ve been working on some PR images for a client and while these images are all pretty simple their tight budget presents it’s own set of challenges. Today I wanted to share an idea that helped quickly solve some of the problems I ran into.
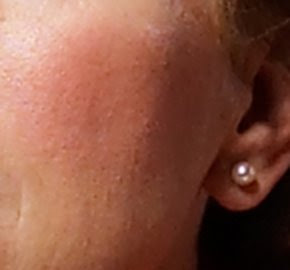
Since these were almost all pre-processed images more than a few of them showed artifacts that are typical of really aggressive sharpening as well as some JPEG artifacts. Here is a close crop showing what I mean.

Looking at the texture of the skin you can see it has a bit of a speckly texture to it. On some images there were little crystal-like whitish specks as well. Retouching these out would normally mean taking a fair amount of time cleaning them up one by one. With the combination of budget and time on this job I needed to be more efficient than that and so I turned to one of my favorite tools in Photoshop, the Reduce Noise Filter.
Normally I use this filter to reduce grain and excessive noise in an image. It can be really useful with skies that have to be blown up a lot. With this filter there are sliders for settings like Strength, Preserve Details, Reduce Color Noise and Sharpen Details. There is also a check box for “Remove JPEG Artifact”. When I’m using it on a sky it’s not unusual to maximize the Strength and Reduce Color Noise settings while I set the others to 0% .
But when I was working on the images for this PR job I remembered the Remove JPEG Artifact feature and thought “What if…” When I set everything to 0% and left the Remove JPEG Artifact turned on I saw that it did a great job of smoothing out most of the specks I was concerned with. Here’s what the same image looked like with the filter set this way:

Using the filter this way looks a lot like a very subtle blur, but the edges are kept pretty sharp. For the skin areas of this image it was a good start on the job. Applying a layer mask made it easy to keep this effect out of the parts of the image that did not need this and with just a little more work on smoothing out the lines etc. I was on to the next image.
That's a great tip for quick result, Dennis! 🙂
On a retouching project I worked on recently, there were skin blemishes all over in the photos (probably b/c of digital shots & shaky camera movement, causing less than ideal skin details)… I used "surface blur" to smooth out the non-edge areas, but it still required some time spent on further adjusting opacity & masking on this blurred layer to restore the necessary details underneath…
I probably could have saved more time w/ your tip 😉
Fae